
Create a virtual tour from a 360° video
Turn a 360 camera walkthrough video into a walkable virtual tour and measurable 3D reconstruction — upload with the IPX provider, track progress, then walk, measure, and comment.
Film a walkthrough with any consumer 360 camera and turn it into a walkable virtual tour with a measurable 3D reconstruction behind it. No laser scanner and no third-party tour platform required — you upload the video, IPX builds the tour.
Any camera that exports equirectangular 360° video works — Insta360, Ricoh Theta, GoPro Max, and similar. Files can be mp4, mov, or insv, up to 10 minutes long.
Before you start
- You need a location to attach the tour to — tours live in a location's Images tab.
- Have your 360° video exported and ready. One continuous walkthrough per video works best.
- Filming a good source video matters more than anything else in this flow. See 360° Video Capture Best Practices before you head to site.
Upload your video
Open the upload modal
On your location, open the Images tab, switch to Virtual Tours, and click Add Virtual Tour.
Choose IPX as the provider
Instead of pasting a share link from Matterport, NavVis, FARO, Cupix, or OpenSpace, pick the BIMIT Tour row at the top — it converts a 360° video into a tour.
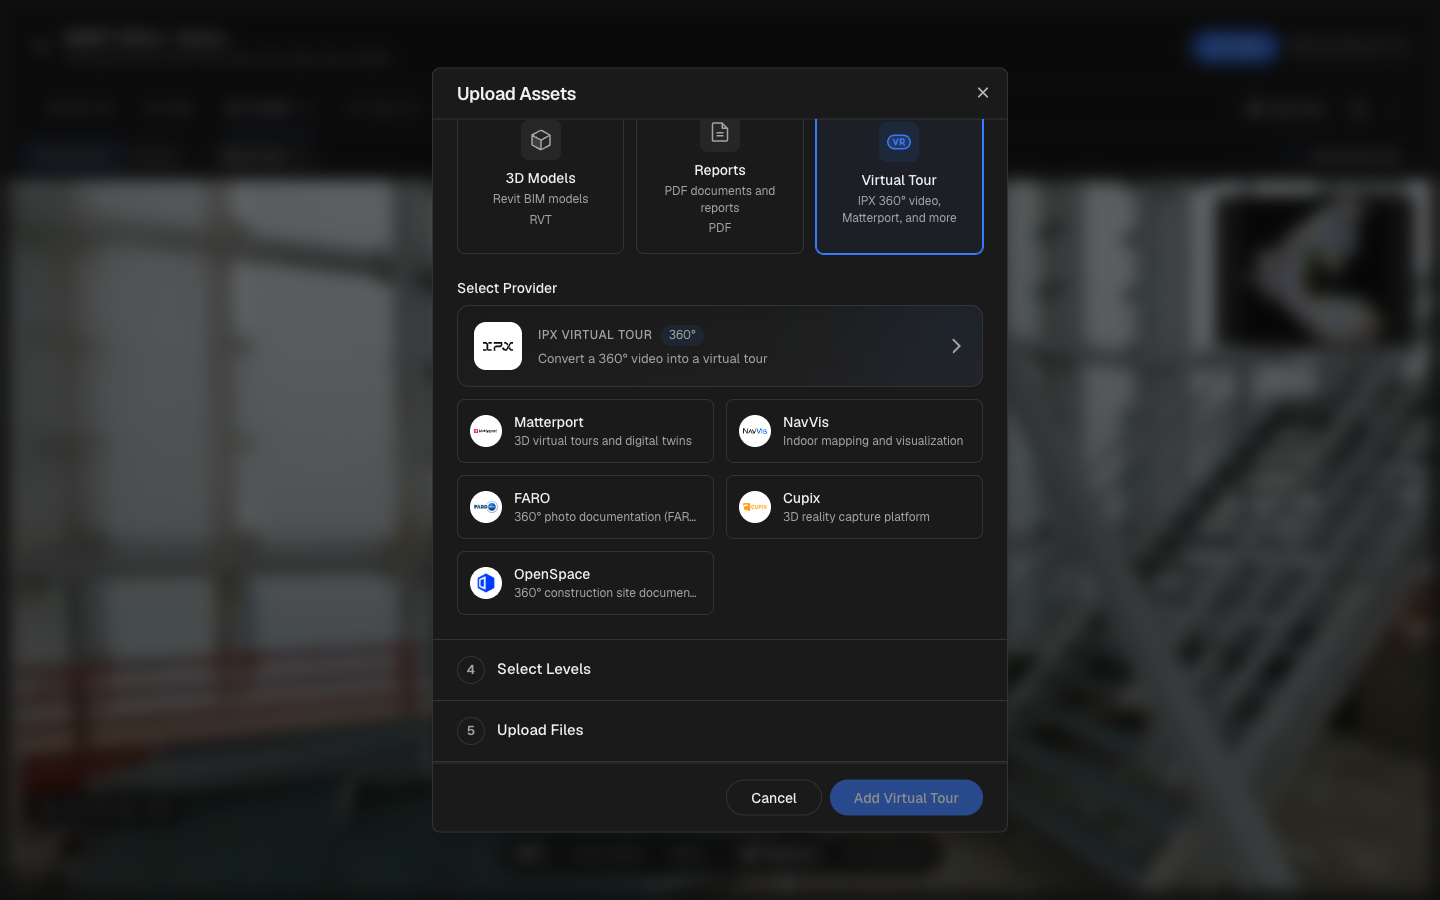
Pick the level and add your video
Choose which level of the building the walkthrough covers, drop in your video file, and confirm. Keep the tab open until the upload finishes.
Track progress while it builds
Watch the progress card
The new tour appears under Virtual Tours with a live progress card: Video received → Mapping your walkthrough → Building the 3D space → Creating your tour, with a running time estimate. Mapping is the longest stage.
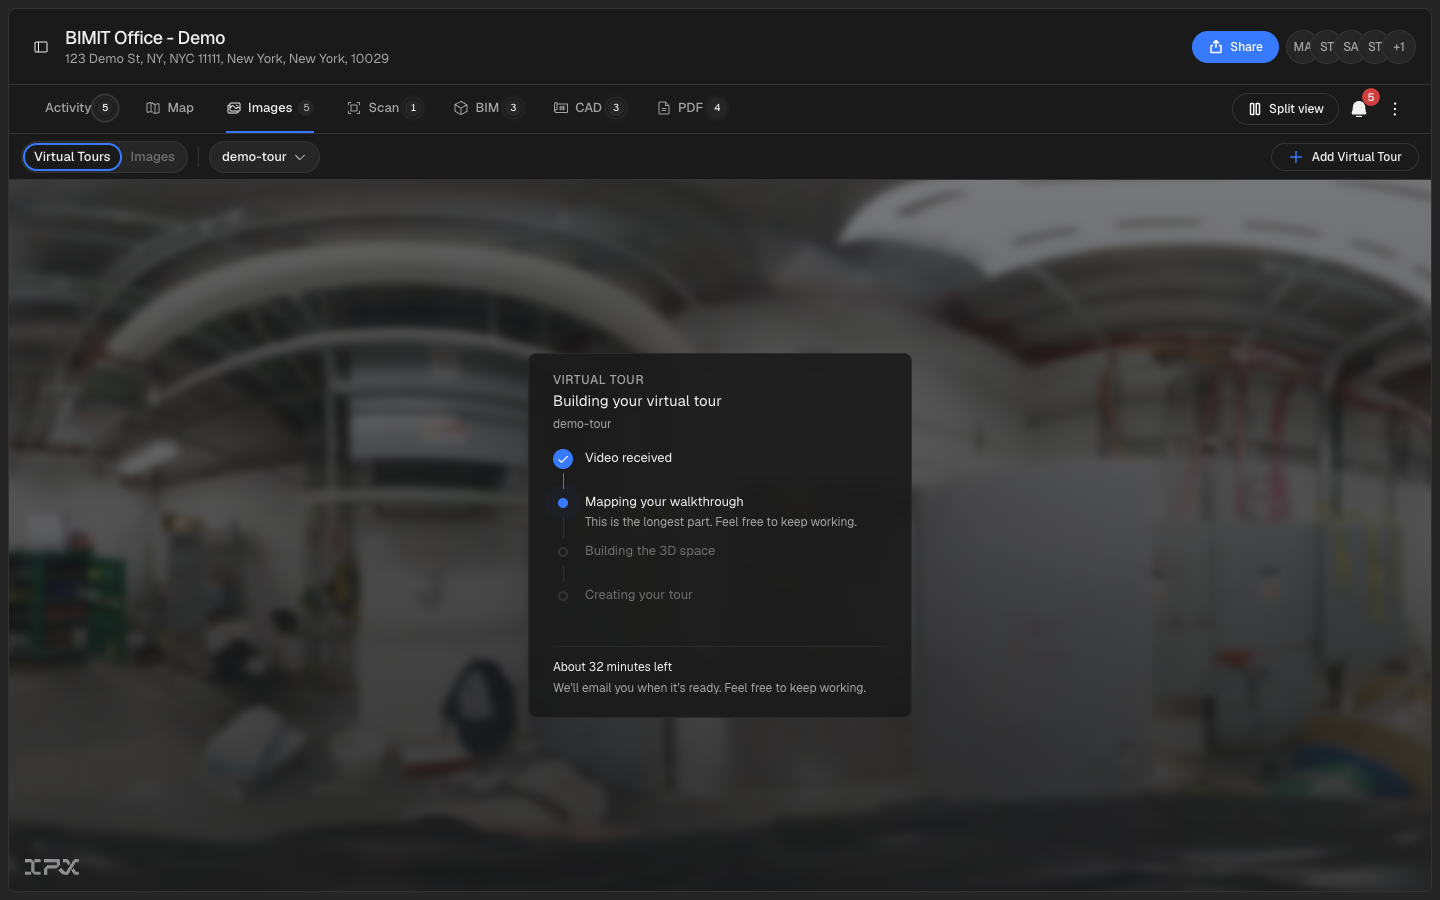
Step away if you want
You don't have to wait around. We email you when the tour is ready — or, if the video couldn't be processed, an email explains why in plain language.
Walk the tour
Open the tour and move through it
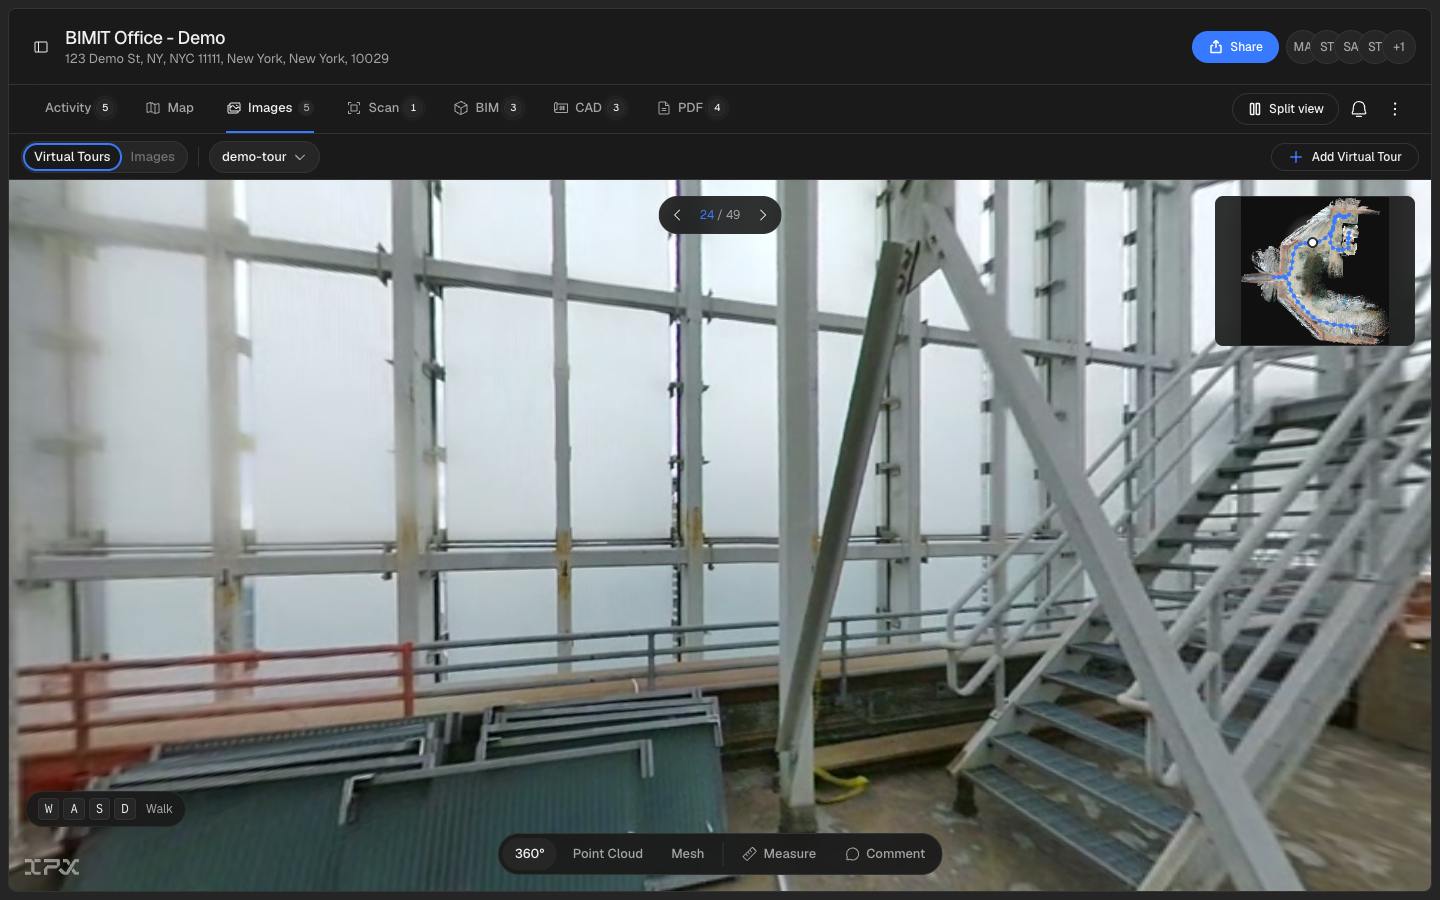
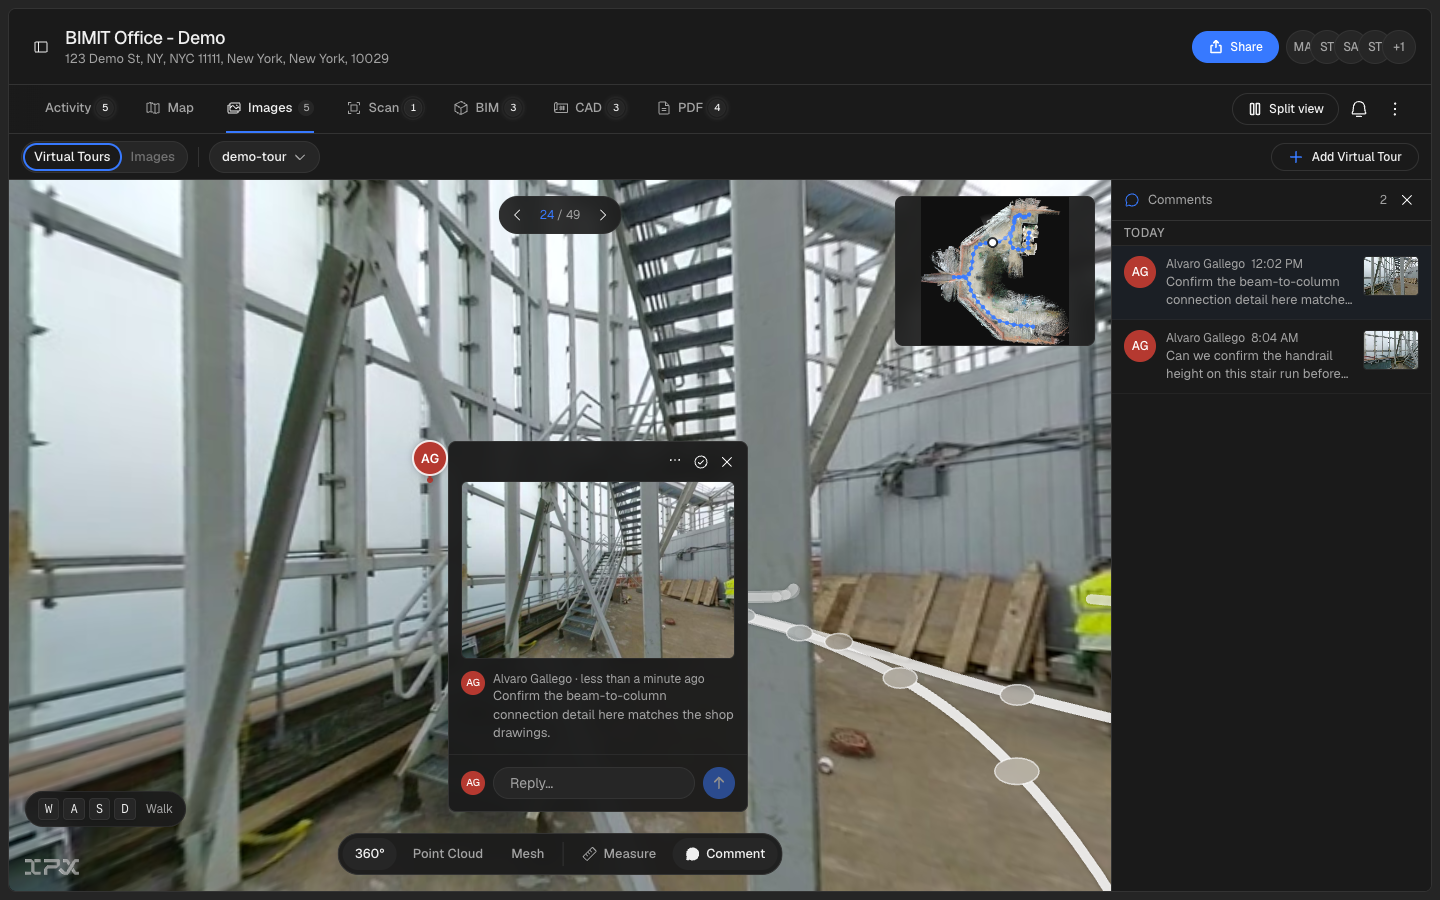
When it's ready, the tour opens right in the viewer. Step through viewpoints with the on-screen arrows or your WASD keys, and drag to look around.
Keep your bearings
The minimap plots your route on a floor plan generated from your video, and the white path ribbon in the scene traces the walkthrough itself.
Associate a BIM model
The first time an editor opens a tour with BIM models available in its project, Choose a BIM model asks which model belongs to that tour. Select a model and choose Associate model. The choice is saved for that tour and shared with other viewers; several tours on different levels can use the same building model. Models still translating or unavailable cannot be selected.
Choose Not now to continue without saving. You can return to Choose BIM model in the three-dot menu to associate or change the model later. People with view-only access use the saved choice and are not asked to configure it.
Association and alignment are separate. BIM Map and comparison use the chosen model only when it has a matching alignment for this tour. Otherwise Map keeps using the point cloud; selecting another model never reuses the previous model's alignment.
Measure and inspect
Switch between views
Open View layer in the bottom toolbar and choose Tour, Point cloud, or BIM model. BIM is available when a model is linked to this tour.
Measure real distances
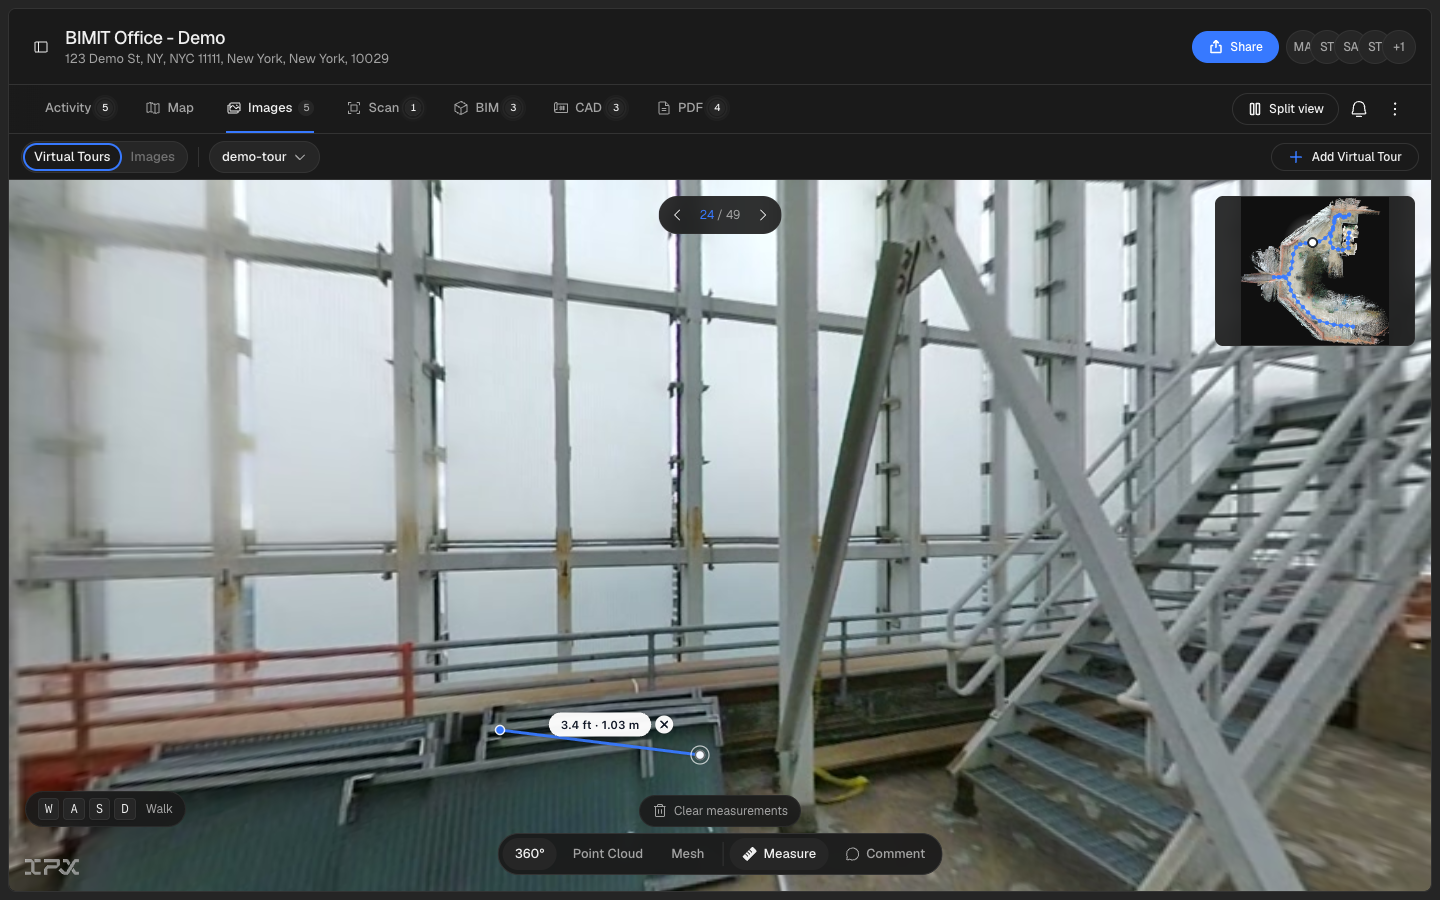
Select Tour as the main view, click Measure, then click two points in the scene. The distance reads out in feet and meters, taken from the 3D reconstruction — not a guess from the image.
Compare layers in the same view
Open the layer menu in the bottom toolbar (labeled Tour, Point cloud, or BIM model) and choose Compare layers. Choose Slide, select what appears to the right of the divider, and drag the divider across the view. Both sides share the same camera. You can also focus the divider and use the arrow keys; Home and End move it to either edge.
When a BIM model is linked, choose Overlay to place it over the main view and adjust its opacity. Choose Stop comparing to return to a single layer. This is separate from comparing two viewers side by side.
BIM comparison is available when an aligned model has already been linked to the tour. Choosing a model does not align it automatically. Alignment remains specific to each tour.
Comment where it matters
Pin a comment to a spot
Select Tour as the main view, click Comment, then click the exact spot in the tour. Your note is pinned to that surface and a snapshot of the current view is attached automatically, so teammates see exactly what you saw. Threads collect in the comments rail on the right.
Spaces dominated by glass, mirrors, or reflective surfaces can trip up the mapping. If processing fails, you'll get an email and an in-tour card with the reason. Re-filming with steadier movement and less glare usually resolves it.
Minimap, orientation and screenshots
Choose Map in the tour toolbar to reveal the aligned BIM at your current position, or the point cloud when no aligned model is available, then smoothly rise and turn into a bird’s-eye view aligned with the saved map orientation. You can also enter this view by continuing to zoom out briefly after reaching the tour’s zoom limit. The ceiling is cut away in this overview so you can see inside. Hover over a position to see the hand cursor, and click to descend smoothly through the model or point cloud into the tour there. Back to tour or Escape returns to the tour. If the point cloud is unavailable, Map opens the floor-plan image: click once to select a position and double-click to enter it, or use the arrow keys and Enter.
The corner minimap shows available positions and your viewing direction. In the three-dot menu, use Show minimap or Hide minimap to toggle it. Hover over the minimap briefly, focus it with the keyboard, or tap it to reveal Hide and Maximize. Maximize opens the same animated Map view.
Editors can choose Minimap orientation, rotate the map with the slider, and select Save orientation to apply that fixed orientation for everyone on the tour. Cancel restores the previous orientation.
Choose Expand tour to fill the platform window. Use Exit expanded view or Escape to return. Download screenshot saves a high-resolution PNG of the current view, without controls, minimap or annotations. Wait until movement and layer loading finish before capturing.